SNOT techniques
SNOT techniques deal with all ways of building not stacking parts with studs oriented upwards. SNOT (Studs Not On Top) is a very general term and there are many different SNOT techniques.
Generally termed advanced, models built using these techniques are more detailed and in official sets these techniques are restricted to older age groups.
Contents |
SNOT Parts
Stud side SNOT parts
Some parts are designed for making SNOT building easy. These parts present stud(s) on their side.
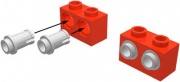
- Brick 1 x 1 with Headlight (Erling's brick)
- Studs on Sides bricks
- Brick 1 x 1 with Studs on Two Opposite Sides
- Brick 1 x 1 with Studs on Four Sides (Travis brick or Dalek brick)
- Brick 1 x 2 with Studs on Two Opposite Sides
- Brick 1 x 4 with Studs on Side
- Brick 2 x 4 x 2 with Studs on Sides
- Brackets
- Bracket 1 x 2 - 1 x 4
- Bracket 1 x 2 - 2 x 2
- Bracket 2 x 2 - 1 x 4
- Bracket 2 x 2 - 2 x 2
Other SNOT parts
- Hinges bricks
- Fences
- Technic brick
Side hole SNOT parts can be turned into Side stud SNOT part using Technic half pin.
Basic Geometry
LEGO bricks have a very simple geometry rule which can be summarised in two ways. It can be thought of as the 5:2 rule (5 plates height = 2 bricks length) or the 5:6 rule (5 bricks height= 6 bricks length). These can be seen in the accompanying image. Of course either of these can be rotated 90 degrees.
If you keep these rules in mind, building SNOT structures becomes much quicker and easier as you can always know how much space you need to fill. Also note that SNOT must always (some rare exceptions exist) involve even numbers of bricks lengthwise or a multiple of 40LDUs (40, 80, 120 etc.) in that notation.
SNOT 90
The most basic form of SNOT is to use the parts above to attach a brick or other element sideways (90 degrees to the usual orientation). This technique is often seen for simple addition of greebling or when attaching printed tiles to walls. It is also seen in road building when a builder seeks an alternative to road plates.
SNOT 180
SNOT generally turns the global orientation of the building about 90 degrees. Combining two SNOT 90 structures leads to a U-turn. But there also exist SNOT techniques that immediatly lead to a U-turn; these are called SNOT 180 techniques.
These can come in handy when a piece is not available in an 'upside-down' version (such as some slopes) or when you are creating studless models. As with any technique there are endless possibilities and these are just some examples.
One of the best parts for doing a SNOT 180 is Technic Plate 1 x 4 with Holes as it allows a 180 reversal of direction in one plate thickness (see the figure at right). James Mathis used this to great effect in his bufferless truck design as seen in his El Capitan project...
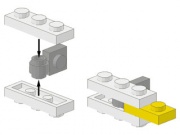
You can also make a tiny SNOT 180 with studs outside using the plate 1x1 with Clip Light. If you use the type 2 of this part (the newer version), the space between the two plate is one plate, as you can see with the yellow part on the picture beside.
See Also
External Links
- SNOT Sphere Generator for LDraw by Bram Lambrecht
- SNOT by Holger Matthes
- LEGO SNOT Building Tips (Brickplayer Article)